Friday, August 12, 2005

Silk Painted Poncho - my first!

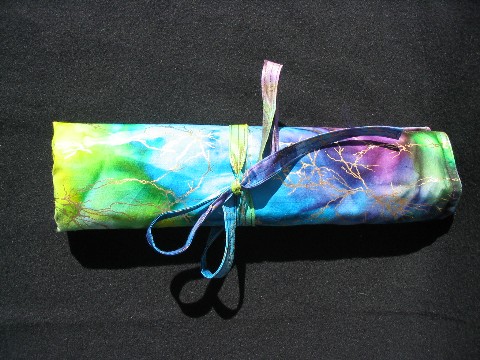
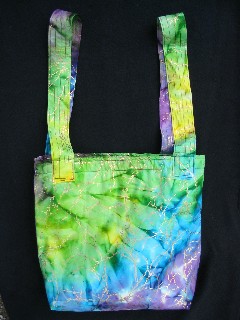
Making a hand painted silk crepe poncho inspired by the art glass necklace I made last week, was the most fun I've had doing something new to me in a long time!

I bought some Seta Color transparent fabric paints from Dharma Trading Company
http://www.dharmatrading.com/sunpainting/ a couple of years ago, but never had the courage to try anything with it. Thanks to the soft urgings of Susan Sorrell, my muse, http://creativechick.blog-city.com/ I decided to use up the, by now, thickened and almost too old paint. If it didn't work out, I really had nothing to lose but a few hours of time outside in the South Florida sun.
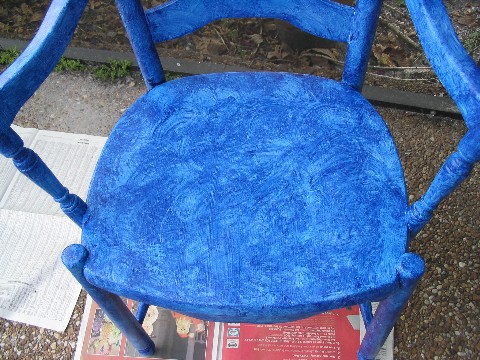
After washing the crepe silk http://www.thaisilks.com/ in the washing machine, in warm water, to shrink it and prepare it to more easily accept the paint, I spread the two yards of wet fabric out on the grass in my front yard. I used three shades of blue and some golden yellow fabric paints. All had to be diluted with water because they were so dried out, thickened to the consistancy of tomato paste.

As soon as I had the fabric weighted down, I started to drip and drizzle and smear the paint with my hands.

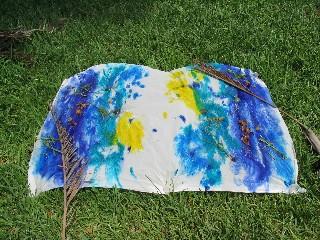
After that I threw kosher salt at it. Kosher salt is great because it comes as big, fat chunks of salt which causes the dye or paint molecules to gravitate toward it. This makes a very interesting pattern as the paint dries. I also tossed on some dried leaves, heart shaped rock crystals, and dried palm branches.

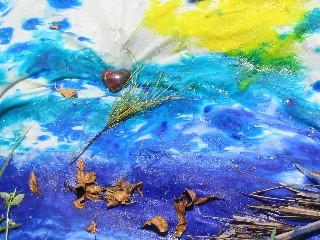
The grass was rather long and made the surface of the fabric roll unevenly. The salt collected in patches and the paints migrated according to the hills and valleys of this uneven surface.

It was great!

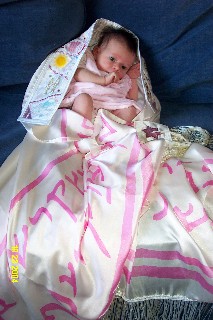
Never before have I allowed myself such freedom in creating! I have used a lot of silk dyes for the prayer shawls that I have made in the past 12 years, but the fabric always had to be stretched out tightly on large frames. Then steamed for three hours to set the dye and then there was a trip to the dry cleaners to remove the gutta resist. I never liked the water soluble resists as I just couldn't get them completely washed out of the fabric. And, unfortunately, I found that within a couple of years, the colors would begin to fade if I had hung a finished piece, like a marriage canopy, on a wall in my sun drenched south Florida home. It was dissatisfying, to say the least! I guess, I didn't use the fabric paints because I was afraid the results would be less intense and just as much work.

Boy was I wrong! And, boy am I glad.

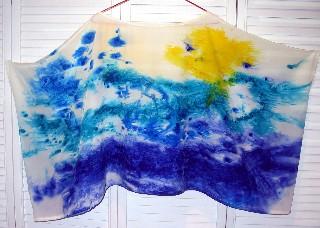
The paint and fabric was dry within two hours. The sun was shining brightly maybe half the time, making the possibility of a clear sunprint of the solid objects laid on the paint, dim. Plus, the paint, as I have said too many times before, was old. But the results, to my eyes, were spectacular!

It was with much excitement that I picked up that piece of silk and took it to my ironing board to set the paint with the iron high on the "cotton" setting. I ironed both sides of that silk. And, I didn't let the fact that the fabric was now as stiff as a paperback cover bother me. I was going for the gold! That paint was gonna set, come heck or high water!

Immediately after ironing it, I dunked it in a pail of water and rinsed and rinsed. Now this is the part that usually brings tears of frustration to my eyes when working with silk dye. I have found that it is IMPOSSIBLE to rinse steamed and dyed silk and not have at least some back staining on the fields of white. There are always free dye molecules just looking to attach to something!

Ah, but this paint stuff. It's amazing. Sure there were extra layers of paint that did not attach to the fabric. But, you know what? They just floated in small clumps and rinsed right down the drain. Not ONE small particle decided to set up housekeeping on my white silk. Zowey!

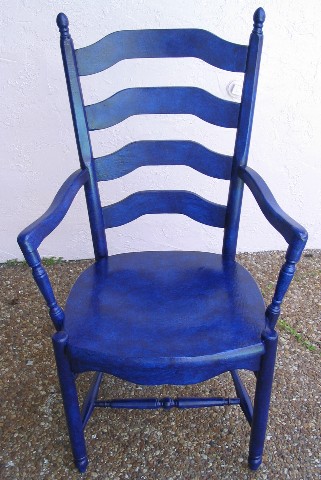
Later that evening, I cut out the pattern and sewed it together, doing nice folded seams and all that jazz. It was a pleasure! The hand of the silk was smooth and soft and as silky as if it had never been abused at all. And, the colors did not wash out or get pale in the rinse bucket. The cobalt was as rich as the necklace that started it all.

Next day I wore it to lunch with a friend and followed that up with three hours of errands. Mucho compliments came my way - all spontaneous, of course!

It's good to be happy.

Sunday, August 07, 2005

Bereshit Tallit - machine embroidery & silk painting


Bereshit Tallit Posted by Picasa

This is a photo of my granddaughter wrapped in the tallit (prayer shawl) I made for her naming day ceremony. I have been making tallitot (plural of prayer shawl, in Hebrew) since 1993 and I guess it's about time I talked a little about this work.

This particular prayer shawl measures 44 inches wide and is 72 inches in length, not counting the 12 inch decorative rayon fringe that is sewn on to either end. The fabric is silk charmeuse and I dyed it, using Dupont french silk dyes. The letters that you see are the Hebrew alefbet (alphabet) done in the most ancient form of that script, found in the Dead Sea Scrolls. The letters seem simple, but they were created using the quills from bird feathers, so the form follows the function of the writing tool.

I found this calligraphy in a wonderful book, "The Hebrew Letter - Calligraphic Variations" by Ismar David. I enlarged the letters to three inches in size and used gutta resist to outline each letter before applying the silk dye. I find this process to be quite nerve racking! If there is one break in the gutta, dye spreads all over the place and the piece is ruined. I, quite literally, find myself holding my breath while applying the gutta around each letter, and again later, when filling in each letter with silk dye.

The dye dries very quickly, but I have found that it is a good idea to let the dye cure for a week or so before I steam it. It seems to give me a more permanent coloring and fewer dye molecules drift around to backstain the silk when I get to the rinsing process. Rinsing comes after 3 hours of steaming in a verticle tube. The fabric is wrapped in cloth and newsprint and rolled around a 50 inch long plastic tube which hovers over a vat of steaming water enclosed by a metal housing. This sets the dye. This is a lot of work.

Next, I take the fabric to the dry cleaners, ask them to put it in a special bag when they submerge it in the solvent, and the gutta resist is removed, leaving a very smooth and beautifully designed piece of fabric. This makes me very happy.

While the fabric is going through all of this, I can work on making the atarah. The atarah is the neckpiece of the tallit. Its' only purpose is to tell the wearer which end is the top. It is, therefore, "the crown" of the garment.


If you look carefully at the embroidery, you will see that it is based on the first lines of the first story of the Bible. Bereshit means "In The Beginning" in Hebrew. Therefore, the figures are of Adam and Eve, the sun, moon and stars, fish, animals, flowers and the Tree of Life as well as the symbol of temptation, the snake.

Each figure is embroidered in a separate hooping on my Janome 9000 embroidery machine. I have first drawn each picture, scanned it in the special scanner which turns it into stitch data, and saved it to my PC. After that, I can save it to a special memory disc which fits into the sewing machine, and will then embroider the image in whatever color thread I choose to use. This is an amazing process and I am in awe when it all works right!

As with any multi-step process, there is a lot of room for errors in any part of the dance. sigh. The fabric has to be hooped correctly, in the exact spot that you want for the embroidery. The whole thing must have adequate stabilization to prevent the fabric from pulling in while the needle pierces it hundreds of times at a rate of 600 stitches per minute. The tension in the bobbin and the top of the machine have to match. And, the needle must have a large eye so the thread won't shred, knot or break. All of which happens with enough frequency to make me want to SCREAM some days.

Some days my machine just wants to flake off. Tune out. Spit up. Freeze. These are the days when I just have to let it have its' tantrum and I let it alone. I do something else and pretend I am not bothered. (but I am!)

Anyway, at some point it all comes together and I can hem the dyed silk, sew on the embroidered, beaded and satin bound atarah and finish by afixing embellished corners to the tallit.

A tallit is a prayer shawl. It is just what it says. It is a garment worn for prayer. In Synagogues and observant Jewish homes around the world, it is worn every morning for the full participation of communion with G-d. Each corner of the tallit is adorned with 4 doubled strands of kosher yarn, usually wool, but sometimes silk or rayon, that are tied in a ritual macrame which relates to the numerology of the Hebrew name for G-d. It is also a reminder of the central prayer of Judaism, "the Shema."

The Shema: "Hear, O Israel, The Lord, Our G-d, The Lord is One."

I'll explain, in English, what the Hebrew word for the name of G-d in the Shema, means. The Hebrew reads from right to left and is, "Yud-Hey-Vav-Hey". Each letter has a numerical equivalent. Yud = 10, Hey = 5, Vav = 6 and Hey = 5 again. If you add these numbers, you get 26. The word for G-d = 26. Add the 2 and the 6 and you get 8. G-d = 8. This symbology is tied into the tsitsit, the ritual fringe.

This is how you tie the macrame for the ritual fringe;
start with-2 double knots, then wind one long string around the remaining pieces of yarn, 7 times,
another double knot, then wind the string 8 times,
double knot, 11 times, double knot.

If you add up the number of windings at this point, 7 + 8 + 11 = 26. The 2 + 6 = 8 = G-d.

The last set of windings of the tstsit is 13, followed by the final double knot (which conveniently keeps it from raveling). This last set is related to the last word in the Shema,"Ehad" which means, "One".
The Hebrew for this word is "Ehad", Aleph = 1, Chet =8, Dalet = 4. 1 + 8 + 4 = 13. (1 + 3 =4)

Therefore, within the windings of the tsitsit, we have a sentence:

"G-d is One".

That is the reason the tsitsit are on the tallit. It serves as a visual reminder that everything is G-d. It all comes from the same source. There isn't anything that isn't G-d. And, if you can remember that and make it part of your day, part of your consciousness, then perhaps you will remember to treat everyone and everything as sacred.

If taken seriously, this would end war.

The final thing about all of this that I find so interesting goes back to the numerology. Numerology is a hobby of mine and I am always adding up the numerical equivalent of words to see how they relate to persons, actions, and states of being. Remember when I said that the Hebrew word for G-d in the Shema = 8? Well, the English word for God in numerology is, G = 7, O = 6, D = 4. Add it up. 7 + 6 + 4 = 17. 1 + 7 = 8. God = 8. Same as the Hebrew, but a different word. Very cool. It gets more interesting.

In numerology, the number 8 is defined as "material satisfaction".
What does our Bible teach us about G-d? G-d wanted to create something physical. G-d wanted a reflection of what was only a dream, a tangible, knowable something that would exist in form. Form has limitation, but when something has form, it becomes knowable. Creation is the way G-d gets to know the dream. And, since we are given form, we are part of G-d and can learn and know, too. The possibility within "material satisfaction" is always present as a way to understand more deeply. This is the gift given with each birth, a built in, hard wired innate aspect of Divine Order.
As I wrote previously, the word, "Ehad" in the Shema equals 13 and 1 + 3 = 4. The number 4 is defined as "Order, Limitation and Service". So, "G-d is One" is also a way of saying "material satisfaction is order, limitation and service". Think about what that means to you.

In English, the numerology for the word "One" is; O = 6, N = 5, E = 5, making a total of 16. Add 1 + 6 = 7. The numerological attributes of the number 7, often considered a holy number, is "Understanding and Analysis".

"G-d is One", or, "material satisfaction is order understood." If G-d wanted to understand what Is/Was/Will be, then you can understand where your own desire for that same thing comes from.
We are not separated from our Creator. We are of our Creator.

Isn't it amazing? I hope I have made this clear enough to understand the way I understand it at this time. There is mystical import to everything that exists and that ancient yearning to know and understand is built right in to every breath, every step, and every dream you make.

That's why I started to make tallitot. They are doorways into prayer.
To see a couple more of the tallit I have made, go to my website -

Saturday, August 06, 2005

Blue Homespun Rolled Brim Knit Hat with Flowers


Blue rolled brim knit hat with flowers Posted by Picasa
Now I am happy with this hat!


I used pink, orange, yellow and green yarn, and a large eyed plastic needle to embroider right over the knitted fabric of the hat. It wasn't as easy to do as I expected. There are holes in knitted work and that makes it difficult to knot the yarns when beginning or ending a new color. I also had to be careful not to make the flowers too tight or dense so that the knit wouldn't be distorted when I put the hat on my head. This hat now has charm! I am looking forward to some trips to Denver to visit family and have an excuse to wear this hat.

Friday, August 05, 2005

Blue Homespun Rolled Brim Hat


Blue Homespun Rolled Brim Hat Posted by Picasa

Another cute hat! I really like this one. It matches the 7 foot scarf I made that twirls nicely and twicely around my neck and keeps me really, really warm. (Even though at 92 degrees, warm isn't exactly what I am looking for.)
But, cute as this is, I find it a little, well, dull.
The opposite of dull is embellished! What is a new knitters' cheating way to embellish?
Embroidery!
To be continued....

Sunday, July 31, 2005

Knit Flower Pattern -


Easy knit flower -

Using one strand of yarn, cast on 150 stitches. For the next and final row, bind off all the stitches.
Here's how - Knit 2 stitches. Pull the first stitch over the second stitch and then off the needle, leaving one stitch. Knit 1 and repeat to the end. After you have bound off all your stitches, you have a long length of yarn. Divide it up so that you have 5 or 6 loops. These are the petals of the flower. Thread a needle, catch the tops of the loops, and pull them together. Secure tightly. This will make a cute and simple flower. Sew the flower to you hat.

Pattern for Fun Fur Rolled Brim Rib Knit Hat -


The Pattern -

First, let me say that I was given this pattern on a torn, faded and photocopied piece of paper by a lady in a yarn shop who sold me too much yarn for this project. (Five balls of yarn when I only needed three... grrrrrr). I have no idea who is the original creator of this beautiful, fun and easy winter hat. If you are out there and want credit, please email me about it. I did not intentionally steal it.

I am sharing the pattern with you because some very nice reader of my blog requested it. I hope you have a lot of fun with it too.

Materials List -

Size 17 knitting needles.
Fun Fur - 2 balls, because you knit with two strands together.
Worsted Weight Yarn - 3 balls, because you knit with three strands together.
I used Plymouth Yarn "Encore" knitting worsted weight 75% Acrylic 25% Wool.

However, the hat I am making now is made up of Caron "Simply Soft", a worsted weight, 4 ply 100% acrylic that is labeled as a #4 weight on the label. I love this yarn! It is very soft, and comes in gorgeous bright colors and is incredibly cheap! Just use something that is or will work like a "chunky" yarn.

Don't worry about gauge too much. If you think the first hat you make is too big for you, decrease the knitting needle size.

This hat is intended for an adult size head. Mine is 22 inches and it fits nicely. Meaning - it's not too tight!!!! Tight hats give me a headache. grrrrr...

Instructions -

Fun Fur -

Cast on 44 stitches with two skeins of the fun fur working as one strand of yarn. Do stockinette stitch, (knit one side, purl the next) for three inches.

Worsted Weight -
Change to three strands of worsted weight yarn, working as one, and knit a rib stitch.
Row 1 - * knit 1, purl 1* repeat across row.
Row 2 - *purl 1, knit 1* repeat across row.
Knit this pattern for 8 inches.
This makes a total of 11 inches for the hat. Lots of coverage for your head and it is very flexible.

Shape crown -
Row 1 - knit 2 tog all the way across. Row 2 - purl 2 tog all the way across. That leaves you with 11 stitches. Easy, huh?

Cut off, leaving a long tail. Thread onto a large eyed needle and weave through all 11 stitches, remove from knitting needle, then go back again.Pull yarns tight and anchor. Sew the back seam.

Because the fun fur is knitted on such large needles, I rolled it up and just took a small stitch to keep it in place at the back.

Done!

This whole project only took me about 5 hours the first time I did it. And, I must say that it is very easy and a fun, fun hat.

Additionally, I added an easy knit flower to the top for an added feminine touch and balance for the furry brim. See the next post for the photo and directions. If I was better at blogging, I would have both in the same post, but I don't know how to put a photo at the end, or even in the middle of one post.
sigh.

Friday, July 22, 2005

Furry Brim Rib Knit Hat


Furry Brim Rib Knit Hat Posted by Picasa

I just adore this hat! I am new to knitting and let me tell you, it's so much fun to find a pattern that knits up really fast and looks good when you are done. I have since added a knit flower to the crown and the hat now looks balanced.

The story that goes with this is a little bitter. I, as I said, am new to all of this knitting stuff and I have been checking out the few yarn shops nearby. I went to one called "Yarn" and found a dusty store with piles of knitting books heaped in stacks making it difficult to peruse them and a few rather dusty examples of things to make hanging from a peg board on the wall. However, sitting on the counter right next to the cash register was this hat. Oh, how pretty!

There were several ladies in the store at the time, all at least ten years older than me and since I'm in my sixtieth year, that's saying somethin'. Busy, busy, busy they were talking about this and that and the other and I began to feel, well, invisible. I am not the kind of person who walks in and says to no one in particular, "Can you help me?". I usually wait. I just assume that the person who is supposed to respond will start the process when they are ready. I find myself waiting a lot. Is having a patient nature a character flaw in today's world? I don't know. I just know I stand and wait. A lot.

About 940 seconds later, one comes over and asks what I want today. I say, "Do you have the pattern for that hat available?" She says, "Yes, it's around here somewhere." And off she goes digging under a big pile coming back to me with a handwritten, photocopied and slightly ripped piece of paper. "Here it is. Do you want some yarn for that?"

Now, again, I am loathe to ask for something and not give something back, so I say, "Well, how much yarn does it take?" She looks at the paper and tells me that the ribbing pattern calls for knitting with three strands of yarn on size 17 needles. The fur is a two strand process. So, I figure I need a total of 5 balls of yarn. However, the pattern also has notes for the matching scarf and the scarf is knitted with two strands of yarn on size 17 needles. Hmmm... I am on shaky ground here. I don't know if I want to make a scarf to match, because for all I know I won't make such a nice hat to begin with and all of my learning will just be me, putting my time in, but not wearing the product.

I stand there looking blank, but the mental motor is whirring. Finally, I ask, "What kind of yarn do you recommend for this hat?" At that point, her face brightens and she goes to a bag on the floor and pulls out a wool/polyester blend in off white and then finds the white eyelash stuff, too.
"Let's see." she says. "The hat needs three strands and the scarf needs to strands and the eye lash is two strands too. You should get five of the wool blend and two of the eyelash."

Now, I am new to this, but I am thinking, "Isn't that a lot of yarn for just a hat and maybe a scarf that I won't make?" Of course, by this time I am in hunger mode. I really want the information on that scrappy looking piece of paper 'cause I really want to make that hat. It never even dawns on me to question her thinking about how much yarn I really need. I feel like an idiot. Just like I feel when going into an automobile showroom and asking to see a certain car, I know that the salesman is going to push and push and push for the most bucks for the car and then will add the guarantees and extra warrantees and service contracts. I know it's going to be a horrid experiece, but I have to go through it to get what I want.

As you have surmised, I am not very Zen.

And I really want (there's that not Zen thing again) the instructions on that flimsy, torn, yellowed piece of paper.

So, I say, "OK" and off we go to the register with the seven balls of yarn, the to-be-cherished piece of paper and my credit card. Five minutes later, and $43.28 dollars poorer, I am out the door with a purple plastic bag holding my new stuff.

When I get home, I immediately rewrite the scrawl, cutting it down to neat lines, spellchecking it and saving it onto my PC, onto a CD and even onto my Zip disc. This piece of paper has now taken on the importance of an ancient scroll and is locked down forever. I print it out.

Five hours later, using size 17 needles, I am the breathlessly proud parent of one fuzzy brim rib knit wool/polyester/fun fur trim hat. I put it on. It is 92 degrees outside. I look ridiculous in this hat. My dark brown hair peaks out from beneath the rolled brim and my glasses poke out beyond the fuzzies. But, I am happy. I put it on the gold painted head and leave it on my kitchen counter to look at during the day.

Not very Zen, but hey, I figure I'm here, I might as well jump in and enjoy all the stuff I'm creating around me. And, I mean that literally.

Anybody else read "TheSeth Material" by Jane Roberts or see the movie/DVD, "What the Bleep Do We Know?"

PS - I have enough yarn left over to make at least 8 more hats. Anybody want one???

Wednesday, July 20, 2005

Knitting Needle Fold and Roll Bag - FREE PATTERN!


Knit Needle fold and roll bag Posted by Picasa

Of course, if you make a new quilted tote bag to put all your new knitting stuff into, you must have one of these to go along with it. I made it a couple of weeks ago and took notes as I went along. I am posting the pattern on my website -
http://www.tallit-embroidery.com/DownloadFreeStuff.html
It will be in a PDF format. I'm really glad I made this thing. My knitting needles were poking holes in various plastic bags and becoming lost. I hate losing things. I guess it is in my nature to take care of what I have and I just love to make the job pretty! I hope you like making this version of a roll up bag. It would be good for paint brushes and chop sticks, too!

Knit Needle Fold& Roll Bag


Knit Needle rolled bag Posted by Picasa

And this is what it looks like when you close it, roll it and tie it up. Pretty! Doesn't it look great with my new quilted knitting tote?

Tuesday, July 19, 2005

Knitting Bag for Dilettantes


Knitting Bag Posted by Picasa

Here is the knitting bag I made. Perfect for every dilettante. It even has a gorgeous quilted purple satin lining so my new yarns won't scratch themselves up while I am tugging on them to make another hat. My 7th grade Home Ec teacher would be proud. It occurred to me however, as I was falling asleep last night, that I put the handles on wrong. Aren't most totes made with the handles attached to the same side? Think about it. If you open it up to put something in, if the handles are attached side by side, there is no obstruction. But putting the handles on the way I did, there is the possibility that the tote won't open wide enough to put an elephant foot into it because the handles will get in the way.
sigh.
That's what happens when you just make stuff up with your scissors and pins. Where was my head and what was I thinking?
Fortunately, the other mistake I made is that the handles are extra long. So, that elephant is not out of luck.

First Knitted Hat


First Knit Hat Posted by Picasa

I think I got a bug. And, I got it bad! I knit this funny furry hat when we went to visit my granddaughter in Denver in January. It made sense then. It was cold outside. However, it is not making any sense now. As the following posts will show, I am still learning how to knit (badly for now) and am stuck on hats.
Where does this stuff come from? Why can't I just forget about learning new stuff and just keep on developing more fully what I already know?
I think Mr. Spock said it well when V'ger's nature was being questioned, and the answer is; "Curiosity Mr. Decker. Insatiable curiosity."
I think I am destined to stay at the dilettane level forever. Maybe my inner self is just a skate bug. You know, the kind that skate on top of lake water?

Saturday, July 02, 2005

Hand Painted Heart Stool


Heart stool Posted by Picasa
This is one of my first forays into hand painting wooden furniture. I used artist's acrylics and painted over a base coat of "Kilz" primer. What fun it was doing this project! And truly fun to look at. I gave it to my husband to take into work and I still hear compliments about its' cheerfulness. Now, isn't that what life is all about? Stuff that makes people smile some during their day?
W.C. Fields said, "Start everyday with a smile and get it over with".
This stool makes that work.

Painted Kitchen Table


Painted Kitchen Table Posted by Picasa
Ah now and here she is, our newly painted kitchen table. Isn't she pretty? It only took me about 10 days to do all the layers of color. It seems I don't like just using a paint brush to lay on a slab of color. Now I have to paint a base coat and layer darker colors one on top of the other, or else I can't sleep at night! It seems my eyes crave depth and interest and apparently I am so hungry for it, I am actually willing to do the work to get it. Yikes! What is happening to me?

The table is still elevated on books of higher learning. It's nice to have a use for good information, but I don't think the authors meant to be appreciated in quite this way...
I still have to paint on several layers of polyurethane to protect the paint, so we will not be able to use our new altar for food sharing until the middle of August. It's so humid here, it's gonna take that long for the poly coat to cure. Oh well, I get to look at it everyday and that's satisfying.

Sunday, June 26, 2005

Cobalt Blue Kitchen Chair -


Cobalt Blue Kitchen Chair Posted by Hello
And here is the final product. With only 9 layers of a blue/purple glaze mix over the original turquoise base, I have a gorgeous cobalt blue chair. To protect it, I sprayed it with an oil base ships varnish that my brother assured me would make this chair safely blue for the rest of its' life.
It's been six months now and there's nary a small chip on it anywhere.

I am happy.

All the other chairs are done now too, but the colors don't send me into fainted vapors like this blue one does. This blue is so interesting to look at in the sunlight. There is a rainbow of blue and purple with hints of, well, just the whole rainbow. I don't know how that happened, but it sure is nice!

Now I need a new table to go with these newly painted chairs.....

Saturday, June 25, 2005

4 Layers Later


4 Layers Later Posted by Hello
This is a combination of blue and purple acrylic paint mixed with an extender and applied using a sea sponge. The fun part was seeing how each layer kept building up and darkening down. I tend to use a circular motion when I have a sponge in my hand. In fact there are 9 walls in my house displaying this same effect. It fascinates me! Round and round my hand goes with the squishy sponge full of paint leaving trails of color over and over. And, even more fun is mixing the paints for each layer. I've been using student grade acrylic paints which are cheap, yes, but what I like about them is their creamy texture. They come out of the tube in a smooth squirt and mix so easily, that I can't seem to force myself to buy the "good" stuff. I wonder, will I regret this later. Will the colors fade? Will the paint change and disappoint me in the future?
Guess it's like anything we take a chance on. It might not work out, but if I don't try, I won't find out.

Friday, June 24, 2005

First Layers


First Layers Posted by Hello
These chairs started out life in my kitchen as unpainted furniture. They reinvented themselves by becoming pecan stained and polyurethaned. They lived for many busy years at a matching formica kitchen table, sturdily supporting our family through uncounted daily meals and lots of happy parties.
Pretty soon, that is to say, within ten years, they began to get bored with their appearance and wanted a redo of some sort. I know this because they were speaking to me, their mother. Changing them was gonna be hard work. They were strongly protected by the polyurethane and making them ready to accept a new color meant breaking down that satin barrier somehow. Fortunately, my brother knows about this kind of stuff and suggested using a "liquid sander". Just by rubbing it on, the barrier would open up and I could paint a base coat onto this impervious finish. Ahhh.
Easy peasy.
Now, I knew that I was taking the cowards way out of this pickle, but I didn't care. I just didn't have the patience or the hand strength to sand each and every curve and crevice of four large chairs. With enthusiasm and optimism, I rubbed down each chair using lots of soft cloths and paper towels, too. As soon as that was done, I applied Kilz.
Kilz. Sounds really final doesn't it? It happens to be a water based, base coat, paint product that promises to seal anything you paint it on and also makes a nice surface to apply your "real"color to.
Apparently, it works! Here are the four formerly brownish stained chairs with their under coats on. From here on in I will be applying deeper colors of paint mixed with a faux extender.
I've done this technique with several walls in my house, but this is the first time I've tried it with chairs.
In fact, all of this work was done in December and I know that it is a success. Here we are six months later and the chairs have been in use for lots of meals and family parties and the paint is actually staying on! Zowey! I sure do like it when things work.

Wednesday, June 22, 2005

Back to Basics


Base Coat Posted by Hello
Here it is and fourteen days have gone by without even one post. I feel like I have to start all over again. That's what travel does to me. At least, that's what happens when I go out of town. We went to see our granddaughter; left on an early Thursday morning and returned the following Monday afternoon. The trip was fun, but everything that I had been working on has since been severed, cut, lost, misplaced, forgotten or ignored in some strange way. I don't know why ripping me out of this house does that, but there it is.

I know I am not neurotically disinclined to leave, but psychically there is some force that is only in balance when I am here. And not somewhere else. Trips to the fabric store, supermarket, movie theatre and restaurants are all OK. But, to go farther than ten miles from this house constitutes a major readjustment in my physical and mental focus to get back to what I had been doing before I left. Some sort of flow just gets jammed up and I slip and slid for at least two weeks before feeling normal again.

sigh.

I've always been this way and wonder how many others have this same problem. I just don't like to leave my home. Everything I like to do is here. And when DH comes home it's time for dinner and it all makes sense. He is the sunshine and the rain and the blessed earth.
And, I am rooted in this place, wondering why it works this way for me.

Wednesday, June 08, 2005

Eye Like to Embroider - part 1


heart eye Posted by Hello
This is a series of one story. There are 9 parts. Continue to read each post of "Eye Like to Embroider" and you will get the whole story and free embroidery, too!

I was standing in line at the grocery store in May 1993, when I saw an ad for a home embroidery sewing machine made by New Home. I hadn't heard of this sewing machine manufacturer because all of my life I had used Singer products.
I was intrigued. A sewing machine that can do embroidery too? What will they think of next? I bought the magazine, perused the ad and looked for a dealer in my area. Amazingly, there was one just a couple of miles away, so the next day I took a never used-in my name-credit card, and drove to the store. $3,295.00 !!!! dollars later, (yes,I still have the original receipt) I came home with this new-fangled sewing/embroidery machine. Yikes! I had never, ever made a purchase of such magnitude without consulting my husband before. But this, this was something else. This spoke to every fiber of my being. I had to have it and I would figure out a way to make the payments.

Eye Like to Embroider - part 2


apple eye Posted by Hello
This New Home 8000 was some fancy sewing machine! It had 116 different stitches programmed into it. From #1 to #26 were all the basic stitches, zig zag stitches, eyelet stitches, triple strength stitches for knits, double over edge stitches to finish the edges of ravely fabric, and even an automatic buttonhole maker to die for! To this very day, 12 years later, I still haven't used all of these amazing stitches. From #27 to 116 there were decorative stitches that made leaves, checker boards, circles, stars, alligators (? did I really need an alligator stitch?) flowers, hearts and on and on. I was gasping with each push of the button.

Eye Like to Embroider - part 3


spiral eye Posted by Hello
This machine came with lots of stuff. One thing was a "Scan and Sew" thingy that you used to scan your artwork, turn it into stitch data and place it onto a memory card which you would then insert into the machine. The other crucial piece was called a "Clothsetter". With this amazing contraption, you placed the fabric into the special hoop, line it up with the mark where you wanted your embroidery to go, and then screw the whole thing to the machine. It then sewed out the design to your wondering eyes. It wasn't always perfect, but it was always fun.
WheW! So much technical stuff to learn!

Eye Like to Embroider - part 4


sun eye Posted by Hello
Ah, but the thing of it was, I could do a simple black drawing on special scanning paper, within a 2 1/4 inch by 2 1/4 inch space and with just a few clicks, I was ready to embroider it out onto fabric. The way this thing was set up, you could have 4 different colors for one design all stored in the same space on the card. So, I could, for example, make a tree. And this tree could be sewn out in the four seasons.
Zowey! One tree with bare branches. The next, the same tree with sweet leaves of spring blooming. The next, a full summer tree with leaves and fruit. And finally, that same tree with autumn leaves falling down onto the ground.

Eye Like to Embroider - part 5


sun flower eye Posted by Hello
I mean it, I was just in heaven! Never before had I ever dreamed that I could do stuff like this. I made all kinds of drawings and copied lots of images from cards and wrapping paper, magazines and the newspaper, too. All of these sources had simple pictures, shapes and letters that became part of my collection.

Eye Like to Embroider - part 6


sun moon eye Posted by Hello
And, my learning curve just took a huge climb into the world of home embroidery, new threads, the importance of stabilizing everything before any embroidery was done, marking, measuring, combining ideas, planning a huge layout of multiple embroideries. It was seemingly endless! I no longer had just a few sewing supplies at my desk. I now had racks of threads, stacks of backing papers, several specialty scissors, 6 different ways to mark fabric, and even a special light so I could see what I was doing accurately.
I could no longer contain it all, scissors, tape measure, pins and pattern, my in one little padded basket. Now I needed a whole room for this new waking dream!

Eye Like to Embroider - part 7


Ying Yang eye Posted by Hello
Fortunately, the store that sold the machine had ongoing free classes every month and I began to meet other women who had also thrown caution out the window and were as addicted to this marvel as much as I was. What fun we had trying new techniques! And, every month there was so much new stuff to buy! New kinds of fancy threads, new stabilizers that dissolved in water or melted under the heat of your iron, pricey professional designs on computer cards for when you wanted something to look really good. It was all so good! Balance arrived. My techniques became reliable. My outcomes gorgeous, at least to my happy eyes. Pretty soon, I figured out a way to make some money to support my habit.