Sunday, June 26, 2005

Cobalt Blue Kitchen Chair -


Cobalt Blue Kitchen Chair Posted by Hello
And here is the final product. With only 9 layers of a blue/purple glaze mix over the original turquoise base, I have a gorgeous cobalt blue chair. To protect it, I sprayed it with an oil base ships varnish that my brother assured me would make this chair safely blue for the rest of its' life.
It's been six months now and there's nary a small chip on it anywhere.

I am happy.

All the other chairs are done now too, but the colors don't send me into fainted vapors like this blue one does. This blue is so interesting to look at in the sunlight. There is a rainbow of blue and purple with hints of, well, just the whole rainbow. I don't know how that happened, but it sure is nice!

Now I need a new table to go with these newly painted chairs.....

Saturday, June 25, 2005

4 Layers Later


4 Layers Later Posted by Hello
This is a combination of blue and purple acrylic paint mixed with an extender and applied using a sea sponge. The fun part was seeing how each layer kept building up and darkening down. I tend to use a circular motion when I have a sponge in my hand. In fact there are 9 walls in my house displaying this same effect. It fascinates me! Round and round my hand goes with the squishy sponge full of paint leaving trails of color over and over. And, even more fun is mixing the paints for each layer. I've been using student grade acrylic paints which are cheap, yes, but what I like about them is their creamy texture. They come out of the tube in a smooth squirt and mix so easily, that I can't seem to force myself to buy the "good" stuff. I wonder, will I regret this later. Will the colors fade? Will the paint change and disappoint me in the future?
Guess it's like anything we take a chance on. It might not work out, but if I don't try, I won't find out.

Friday, June 24, 2005

First Layers


First Layers Posted by Hello
These chairs started out life in my kitchen as unpainted furniture. They reinvented themselves by becoming pecan stained and polyurethaned. They lived for many busy years at a matching formica kitchen table, sturdily supporting our family through uncounted daily meals and lots of happy parties.
Pretty soon, that is to say, within ten years, they began to get bored with their appearance and wanted a redo of some sort. I know this because they were speaking to me, their mother. Changing them was gonna be hard work. They were strongly protected by the polyurethane and making them ready to accept a new color meant breaking down that satin barrier somehow. Fortunately, my brother knows about this kind of stuff and suggested using a "liquid sander". Just by rubbing it on, the barrier would open up and I could paint a base coat onto this impervious finish. Ahhh.
Easy peasy.
Now, I knew that I was taking the cowards way out of this pickle, but I didn't care. I just didn't have the patience or the hand strength to sand each and every curve and crevice of four large chairs. With enthusiasm and optimism, I rubbed down each chair using lots of soft cloths and paper towels, too. As soon as that was done, I applied Kilz.
Kilz. Sounds really final doesn't it? It happens to be a water based, base coat, paint product that promises to seal anything you paint it on and also makes a nice surface to apply your "real"color to.
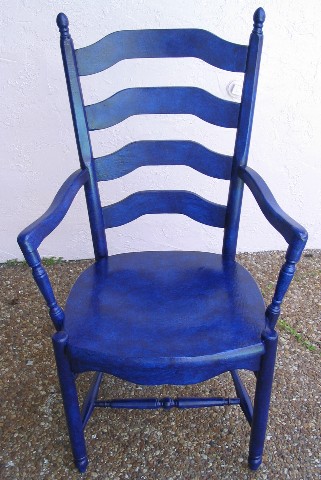
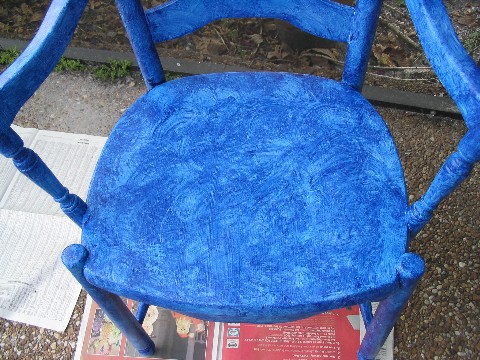
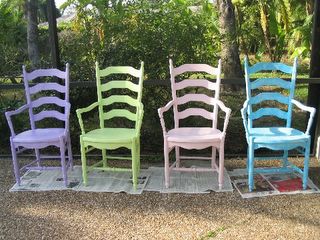
Apparently, it works! Here are the four formerly brownish stained chairs with their under coats on. From here on in I will be applying deeper colors of paint mixed with a faux extender.
I've done this technique with several walls in my house, but this is the first time I've tried it with chairs.
In fact, all of this work was done in December and I know that it is a success. Here we are six months later and the chairs have been in use for lots of meals and family parties and the paint is actually staying on! Zowey! I sure do like it when things work.

Wednesday, June 22, 2005

Back to Basics


Base Coat Posted by Hello
Here it is and fourteen days have gone by without even one post. I feel like I have to start all over again. That's what travel does to me. At least, that's what happens when I go out of town. We went to see our granddaughter; left on an early Thursday morning and returned the following Monday afternoon. The trip was fun, but everything that I had been working on has since been severed, cut, lost, misplaced, forgotten or ignored in some strange way. I don't know why ripping me out of this house does that, but there it is.

I know I am not neurotically disinclined to leave, but psychically there is some force that is only in balance when I am here. And not somewhere else. Trips to the fabric store, supermarket, movie theatre and restaurants are all OK. But, to go farther than ten miles from this house constitutes a major readjustment in my physical and mental focus to get back to what I had been doing before I left. Some sort of flow just gets jammed up and I slip and slid for at least two weeks before feeling normal again.

sigh.

I've always been this way and wonder how many others have this same problem. I just don't like to leave my home. Everything I like to do is here. And when DH comes home it's time for dinner and it all makes sense. He is the sunshine and the rain and the blessed earth.
And, I am rooted in this place, wondering why it works this way for me.

Wednesday, June 08, 2005

Eye Like to Embroider - part 1


heart eye Posted by Hello
This is a series of one story. There are 9 parts. Continue to read each post of "Eye Like to Embroider" and you will get the whole story and free embroidery, too!

I was standing in line at the grocery store in May 1993, when I saw an ad for a home embroidery sewing machine made by New Home. I hadn't heard of this sewing machine manufacturer because all of my life I had used Singer products.
I was intrigued. A sewing machine that can do embroidery too? What will they think of next? I bought the magazine, perused the ad and looked for a dealer in my area. Amazingly, there was one just a couple of miles away, so the next day I took a never used-in my name-credit card, and drove to the store. $3,295.00 !!!! dollars later, (yes,I still have the original receipt) I came home with this new-fangled sewing/embroidery machine. Yikes! I had never, ever made a purchase of such magnitude without consulting my husband before. But this, this was something else. This spoke to every fiber of my being. I had to have it and I would figure out a way to make the payments.

Eye Like to Embroider - part 2


apple eye Posted by Hello
This New Home 8000 was some fancy sewing machine! It had 116 different stitches programmed into it. From #1 to #26 were all the basic stitches, zig zag stitches, eyelet stitches, triple strength stitches for knits, double over edge stitches to finish the edges of ravely fabric, and even an automatic buttonhole maker to die for! To this very day, 12 years later, I still haven't used all of these amazing stitches. From #27 to 116 there were decorative stitches that made leaves, checker boards, circles, stars, alligators (? did I really need an alligator stitch?) flowers, hearts and on and on. I was gasping with each push of the button.

Eye Like to Embroider - part 3


spiral eye Posted by Hello
This machine came with lots of stuff. One thing was a "Scan and Sew" thingy that you used to scan your artwork, turn it into stitch data and place it onto a memory card which you would then insert into the machine. The other crucial piece was called a "Clothsetter". With this amazing contraption, you placed the fabric into the special hoop, line it up with the mark where you wanted your embroidery to go, and then screw the whole thing to the machine. It then sewed out the design to your wondering eyes. It wasn't always perfect, but it was always fun.
WheW! So much technical stuff to learn!

Eye Like to Embroider - part 4


sun eye Posted by Hello
Ah, but the thing of it was, I could do a simple black drawing on special scanning paper, within a 2 1/4 inch by 2 1/4 inch space and with just a few clicks, I was ready to embroider it out onto fabric. The way this thing was set up, you could have 4 different colors for one design all stored in the same space on the card. So, I could, for example, make a tree. And this tree could be sewn out in the four seasons.
Zowey! One tree with bare branches. The next, the same tree with sweet leaves of spring blooming. The next, a full summer tree with leaves and fruit. And finally, that same tree with autumn leaves falling down onto the ground.

Eye Like to Embroider - part 5


sun flower eye Posted by Hello
I mean it, I was just in heaven! Never before had I ever dreamed that I could do stuff like this. I made all kinds of drawings and copied lots of images from cards and wrapping paper, magazines and the newspaper, too. All of these sources had simple pictures, shapes and letters that became part of my collection.

Eye Like to Embroider - part 6


sun moon eye Posted by Hello
And, my learning curve just took a huge climb into the world of home embroidery, new threads, the importance of stabilizing everything before any embroidery was done, marking, measuring, combining ideas, planning a huge layout of multiple embroideries. It was seemingly endless! I no longer had just a few sewing supplies at my desk. I now had racks of threads, stacks of backing papers, several specialty scissors, 6 different ways to mark fabric, and even a special light so I could see what I was doing accurately.
I could no longer contain it all, scissors, tape measure, pins and pattern, my in one little padded basket. Now I needed a whole room for this new waking dream!

Eye Like to Embroider - part 7


Ying Yang eye Posted by Hello
Fortunately, the store that sold the machine had ongoing free classes every month and I began to meet other women who had also thrown caution out the window and were as addicted to this marvel as much as I was. What fun we had trying new techniques! And, every month there was so much new stuff to buy! New kinds of fancy threads, new stabilizers that dissolved in water or melted under the heat of your iron, pricey professional designs on computer cards for when you wanted something to look really good. It was all so good! Balance arrived. My techniques became reliable. My outcomes gorgeous, at least to my happy eyes. Pretty soon, I figured out a way to make some money to support my habit.

Eye Like to Embroider - part 8


Yud-Hey-Vav-Hey eye Posted by Hello
I began to add embroidery to the tallitot, the prayer shawls, I was making for women to wear for their Bat Mitzvah's at my synagogue. I made lots of wonderful small sized designs to embroider on the corners and on the atarah, the neck piece, of these ritual garments. With experience and courage, I even began to string together Hebrew words with this amazing machine. I embroidered short passages from the Bible, words of the holidays and Hebrew names also, to make the tallit more personalized. It was a wonderful enriching experience and it did indeed, let me make my credit card payments on time.

Eye Like to Embroider -part 9 -final post to this story


Creation atarah Posted by Hello
Here is a photo of one of my favorite projects. It's the story of the Creation embroidered on an atarah using this, my first home embroidery machine, the New Home 8000.

I have since upgraded two more times. I have the 9000 and 10000 series of embroidery machines to work with. The company name was changed to Janome and I am a loyal fan. I have never been disappointed with any made by their products that I have bought and used. These home embroidery machines are reliable workhorses. And all they need is a yearly checkup for some minor cleaning and adjustments. The shop where I buy my stuff is amazing - http://www.sunshinesewing.com/.

I now have a website with a few of the tallit sets that I make there. If you want to see them, go to http://www.tallit-embroidery.com/.

This group of embroidered eyes that you have seen throughout this post are ones that I digitized using free clip art. I have made them available for free through http://www.annthegran.com/.
They are in a .pes format there,
and you can also download them for free at my sites' free download page at http://www.tallit-embroidery.com/DownloadFreeStuff.html

They will be zipped in a .sew or .jef format. You can change them for your embroidery machine by using soft ware like Buzz Tools.

Go to http://www.buzztools.com/ for more information.

I have another set of eyes available, but that will be a story for another day.

Thursday, June 02, 2005

First Day Journal Dress pattern - free!


First Day Journal Dress Posted by Hello
Becoming a grandma has been lots of fun. Now I get to make stuff for a little girl! I took lots of digital photos of her in her first 24 hours and later decided to do this with it. It's a pattern with instructions to make a First Day Journal Dress using a commercial pattern and appliqués that I created. It's a fun art-to-wear project that becomes a family heirloom that is absorbing to plan and make. The idea can be used on all kinds of clothing, but it is especially dear on this little dress for a 6 to 9 month old baby girl. Go to my web site http://www.tallit-embroidery.com/DownloadFreeStuff.html to download the FREE appliques and instructions. I
hope you enjoy it! I saved it in a PDF file, so get the free Adobe Reader to save, read and print out the file at www.adobe.com
Feed back, I want feed back! Send me photos of your work and I will show them to everybody - you'll be famous!